
In this lesson we’ll learn about how to effectively run jobs in the background, create notifications and periodically schedule long running background processes.
Index
- Services
- Services vs Loaders
- Started Services
- Service Lifecycle
- Notifications
- Foreground Services
- Job Scheduler
- Broadcast Receiver
Services
A Service is an application component that can perform long-running operations in the background, and it does not provide a user interface. Another application component can start a service, and it continues to run in the background even if the user switches to another application. For example, a service can handle network transactions, play music, perform file I/O, or interact with a content provider, all from the background.
There are the three different types of services:
-
Foreground
A foreground service performs some operation that is noticeable to the user. For example, an audio app would use a foreground service to play an audio track. Foreground services must display a status bar icon. Foreground services continue running even when the user isn’t interacting with the app. -
Background
A background service performs an operation that isn’t directly noticed by the user. For example, if an app used a service to compact its storage, that would usually be a background service. -
Bound
A service is bound when an application component binds to it by callingbindService(). A bound service offers a client-server interface that allows components to interact with the service, send requests, receive results, and even do so across processes with interprocess communication (IPC). A bound service runs only as long as another application component is bound to it. Multiple components can bind to the service at once, but when all of them unbind, the service is destroyed.
Note: A service runs in the main thread of its hosting process, the service doesn’t create its own thread and doesn’t run in a separate process unless we specify that it should.
If our service is going to do any CPU-intensive work or blocking operations, create a new thread within the service to do that work. By using a separate thread, we reduce the risk of Application Not Responding (ANR) errors, and the application’s main thread can remain dedicated to user interaction with our activities.
To implement any kind of service in our app:
- Declare the service in the manifest.
- Create implementation code of the service.
- Manage the service lifecycle.
Services vs Loaders
But when should I be using a Service versus using a Loader? The answer isn’t always obvious, but here are some guidelines.
If the background task is loading information that will only be used in the activity, it’s a good candidate for a loader. Examples of this would be decoding an image that is going to be used in an image view, or querying a database that is going to be used to populate a RecyclerView adapter. Some network transactions even fall into this use case. If our app is inherently real time, we might want to just fetch data as we need it in the UI rather than cache the data in a database.
So when should a service be used? When the task that we are doing is decoupled from the user interface. An example would be updating a database in the background. While the user interface needs to know that this is happening, the operation should continue, even if the application doesn’t have an active window.
In short, if we’re loading or processing data that will be used in the UI, use a loader. If we need to process upload or download data in a way where the end result will not directly affect the UI such as caching data in database, do it in a service.
Started Services
As with activities and other components, we must declare all services in our application’s manifest file. To declare a service, add a <service> element as a child of the <application> element. For example:
<?xml version="1.0" encoding="utf-8"?>
<manifest xmlns:android="http://schemas.android.com/apk/res/android"
          package="com.example.android.background">

    <application
        ... >
        <activity
            ... >
            ...
        </activity>

        <!-- Declare WaterReminderIntentService in the Manifest and set the exported
         attribute to false-->
        <service
            android:name=".sync.WaterReminderIntentService"
            android:exported="false"/>
    </application>
</manifest>
The android:name attribute is the only required attribute, it specifies the class name of the service. After we publish our application, leave this name unchanged to avoid the risk of breaking code due to dependence on explicit intents to start or bind the service.
To block access to a service from other applications, declare the service as private. To do this, set the android:exported attribute to false. This stops other apps from starting our service, even when they use an explicit intent.
A started service is one that another component starts by calling startService(), which results in a call to the service’s onStartCommand() method. These are detailed steps of how a service starts:
-
An application component such as an activity calls
startService()and passes in anIntent. TheIntentspecifies the service and includes any data for the service to use. -
The system calls the service’s
onCreate()method and any other appropriate callbacks on the main thread. It’s up to the service to implement these callbacks with the appropriate behavior, such as creating a secondary thread in which to work. -
The system calls the service’s
onStartCommand()method, passing in theIntentsupplied by the client in step 1. (The client in this context is the application component that calls the service.)
Once started, a service can run in the background indefinitely, even if the component that started it is destroyed. Usually, a started service performs a single operation and does not return a result to the caller. For example, it might download or upload a file over the network. When the operation is done, the service should stop itself by calling stopSelf(), or another component can stop it by calling stopService().
IntentService
This is a subclass of Service that uses a worker thread to handle all of the start requests, one at a time. This is the best option if we don’t require that our service handle multiple requests simultaneously. Implement onHandleIntent(), which receives the intent for each start request so that we can complete the background work.
The IntentService class does the following:
- It creates a default worker thread that executes all of the intents that are delivered to
onStartCommand(), separate from our application’s main thread. - Creates a work queue that passes one intent at a time to our
onHandleIntent()implementation, so we never have to worry about multi-threading. - Stops the service after all of the start requests are handled, so we never have to call
stopSelf(). - Provides a default implementation of
onBind()that returns null. - Provides a default implementation of
onStartCommand()that sends the intent to the work queue and then to ouronHandleIntent()implementation.
To complete the work that is provided by the client, implement onHandleIntent(). However, we also need to provide a small constructor for the service.
In the context of the WaterReminder app, our service will be:
public class WaterReminderIntentService extends IntentService {

    /**
     * A constructor is required, and must call the super IntentService(String)
     * constructor with a name for the worker thread.
     */
    public WaterReminderIntentService() {
        super("WaterReminderIntentService");
    }

    /**
     * The IntentService calls this method from the default worker thread with
     * the intent that started the service. When this method returns, IntentService
     * stops the service, as appropriate.
     */
    @Override
    protected void onHandleIntent(Intent intent) {
        // Normally we would do some work here, like download a file.

        // Get the action from the Intent that started this Service
        String action = intent.getAction();

        // Call ReminderTasks.executeTask and pass in the action to be performed
        ReminderTasks.executeTask(this, action);
    }
}
Then we start our service from wherever we want it to be executed within our application, for example from our MainActivity.java.
public class MainActivity extends AppCompatActivity {

    @Override
    protected void onCreate(Bundle savedInstanceState) {
        super.onCreate(savedInstanceState);
        setContentView(R.layout.activity_main);

        // Rest of onCreate ...

        incrementWater();
    }

    /**
     * Adds one to the water count and shows a toast
     */
    public void incrementWater() {
        // Create an explicit intent for WaterReminderIntentService
        Intent incrementWaterCountIntent = new Intent(this, WaterReminderIntentService.class);
        // Set the action of the intent to ACTION_INCREMENT_WATER_COUNT
        incrementWaterCountIntent.setAction(ReminderTasks.ACTION_INCREMENT_WATER_COUNT);
        // Call startService and pass the explicit intent we just created
        startService(incrementWaterCountIntent);
    }

    // Rest of Activity...
}
Service Lifecycle
The lifecycle of a service is simpler than that of an activity. However, it’s even more important that we pay close attention to how our service is created and destroyed. Because a service has no UI, services can continue to run in the background with no way for the user to know, even if the user switches to another application. This consumes resources and drains battery.
Like an activity, a service has lifecycle callback methods that we can implement to monitor changes in the service’s state and perform work at the appropriate times. The following skeleton service demonstrates each of the lifecycle methods:
public class ExampleService extends Service {
    int mStartMode;       // indicates how to behave if the service is killed
    IBinder mBinder;      // interface for clients that bind
    boolean mAllowRebind; // indicates whether onRebind should be used

    @Override
    public void onCreate() {
        // The service is being created
    }
    @Override
    public int onStartCommand(Intent intent, int flags, int startId) {
        // The service is starting, due to a call to startService()
        return mStartMode;
    }
    @Override
    public IBinder onBind(Intent intent) {
        // A client is binding to the service with bindService()
        return mBinder;
    }
    @Override
    public boolean onUnbind(Intent intent) {
        // All clients have unbound with unbindService()
        return mAllowRebind;
    }
    @Override
    public void onRebind(Intent intent) {
        // A client is binding to the service with bindService(),
        // after onUnbind() has already been called
    }
    @Override
    public void onDestroy() {
        // The service is no longer used and is being destroyed
    }
}
-
The entire lifetime of a service occurs between the time that
onCreate()is called and the time thatonDestroy()returns. Like an activity, a service does its initial setup inonCreate()and releases all remaining resources inonDestroy(). -
The active lifetime of a service begins with a call to either
onStartCommand()oronBind(). Each method is handed the Intent that was passed to eitherstartService()orbindService().
If the service is started, the active lifetime ends at the same time that the entire lifetime ends (the service is still active even afteronStartCommand()returns). If the service is bound, the active lifetime ends whenonUnbind()returns.

Notifications
A notification is a message our app displays to the user outside our application’s normal UI. When we tell the system to issue a notification, the notification first appears to the user as an icon in the notification area, on the left side of the status bar.
To see the details of the notification, the user opens the notification drawer, or views the notification on the lock screen if the device is locked. The notification area, the lock screen, and the notification drawer are system-controlled areas that the user can view at any time.
In supported launchers and on devices running Android 8.0 (API level 26) and higher apps can also display notification badges on app icons. Users can also long-press on an app icon to glance at the notifications associated with a notification badge.
Android O Notification Channels
Starting in Android 8.0 (API level 26), notification channels allow us to create a user-customizable channel for each type of notification we want to display. Notification channels provide a unified system to help users manage notifications. When we target Android 8.0 (API level 26), we must implement one or more notification channels to display notifications to our users. If we don’t target Android 8.0 (API level 26) but our app is used on devices running Android 8.0 (API level 26), our app behaves the same as it would on devices running Android 7.1 (API level 25) or lower.
We can create an instance of NotificationChannel for each distinct type of notification we need to send. We can also create notification channels to reflect choices made by users of our app.
To create a notification channel:
- Construct a notification channel object with an ID that’s unique within our package.
- Configure the notification channel object with any desired initial settings, such as an alert sound, as well as an optional description visible to the user.
- Submit the notification channel object to the notification manager.
public class NotificationUtils {

    /**
     * This notification channel id is used to link notifications to this channel
     */
    private static final String WATER_REMINDER_NOTIFICATION_CHANNEL_ID = "reminder_notification_channel";

    // This method will create a notification for charging
    public static void remindUserBecauseCharging(Context context) {
        // Get the NotificationManager using context.getSystemService
        NotificationManager notificationManager = (NotificationManager)
        context.getSystemService(Context.NOTIFICATION_SERVICE);

        // Create a notification channel for Android O devices
        if (Build.VERSION.SDK_INT >= Build.VERSION_CODES.O) {
            NotificationChannel channel = new NotificationChannel(
                    WATER_REMINDER_NOTIFICATION_CHANNEL_ID,
                    context.getString(R.string.main_notification_channel_name),
                    NotificationManager.IMPORTANCE_HIGH);
            notificationManager.createNotificationChannel(channel);
        }

        // Rest of method remindUserBecauseCharging()...
    }

    // Rest of NotificationUtils...
}
Creating Notifications & Pending Intents
We create a notification using the NotificationCompat.Builder class. We use NotificationCompat for the best backward compatibility. The builder classes simplify the creation of complex objects.
When using NotificationCompat.Builder, we must assign a small icon, text for a title, and the notification message. We should keep the notification message shorter than 40 characters and not repeat what’s in the title.
We also need to set an Intent that determines what happens when the user clicks the notification. Usually this Intent results in our app launching an Activity.
To make sure the system delivers the Intent even when our app isn’t running when the user clicks the notification, wrap the Intent in a PendingIntent object, which allows the system to deliver the Intent regardless of the app state.
To instantiate a PendingIntent, use one of the following methods, depending on how we want the contained Intent to be delivered:
-
To launch an Activity when a user clicks on the notification, use
PendingIntent.getActivity(), passing in an explicitIntentfor the Activity we want to launch. ThegetActivity()method corresponds to anIntentdelivered usingstartActivity(). -
For an
Intentpassed intostartService()(for example a service to download a file), usePendingIntent.getService(). -
For a broadcast
Intentdelivered withsendBroadcast(), usePendingIntent.getBroadcast().
Each of these PendingIntent methods take the following arguments:
-
The application context.
-
A request code, which is a constant integer ID for the
PendingIntent. -
The
Intentto be delivered. -
A
PendingIntentflag that determines how the system handles multiplePendingIntentobjects from the same application.
public class NotificationUtils {

    /*
     * This notification ID can be used to access our notification after we've displayed it. This
     * can be handy when we need to cancel the notification, or perhaps update it. This number is
     * arbitrary and can be set to whatever we like. 1138 is in no way significant.
     */
    private static final int WATER_REMINDER_NOTIFICATION_ID = 1138;
    /**
     * This pending intent id is used to uniquely reference the pending intent
     */
    private static final int WATER_REMINDER_PENDING_INTENT_ID = 3417;

    // This method will create a notification for charging
    public static void remindUserBecauseCharging(Context context) {

        // Create a notification channel for Android O devices
        // ...

        // Use NotificationCompat.Builder to create a notification
        // that:
        // - has a color of R.colorPrimary
        // - has ic_drink_notification as the small icon
        // - uses icon returned by the largeIcon helper method as the large icon
        // - sets the title to the charging_reminder_notification_title String resource
        // - sets the text to the charging_reminder_notification_body String resource
        // - sets the style to NotificationCompat.BigTextStyle().bigText(text)
        // - sets the notification defaults to vibrate
        // - uses the content intent returned by the contentIntent helper method for the contentIntent
        // - automatically cancels the notification when the notification is clicked
        NotificationCompat.Builder notificationBuilder = new NotificationCompat
                .Builder(context,WATER_REMINDER_NOTIFICATION_CHANNEL_ID)
                .setColor(ContextCompat.getColor(context, R.color.colorPrimary))
                .setSmallIcon(R.drawable.ic_drink_notification)
                .setLargeIcon(largeIcon(context))
                .setContentTitle(context.getString(R.string.charging_reminder_notification_title))
                .setContentText(context.getString(R.string.charging_reminder_notification_body))
                .setStyle(new NotificationCompat.BigTextStyle().bigText(
                        context.getString(R.string.charging_reminder_notification_body)))
                .setDefaults(Notification.DEFAULT_VIBRATE)
                .setContentIntent(contentIntent(context))
                .setAutoCancel(true);

        // If the build version is greater than JELLY_BEAN and lower than OREO,
        // set the notification's priority to PRIORITY_HIGH.
        if (Build.VERSION.SDK_INT >= Build.VERSION_CODES.JELLY_BEAN
                && Build.VERSION.SDK_INT < Build.VERSION_CODES.O) {
            notificationBuilder.setPriority(NotificationCompat.PRIORITY_HIGH);
        }

        // Trigger the notification by calling notify on the NotificationManager.
        // Pass in a unique ID of our choosing for the notification and notificationBuilder.build()
        notificationManager.notify(WATER_REMINDER_NOTIFICATION_ID, notificationBuilder.build());
    }

    // Create a helper method that should return a PendingIntent. This method will create
    // the pending intent which will trigger when the notification is pressed. This pending
    // intent should open up the MainActivity.
    private static PendingIntent contentIntent(Context context) {
        // Create an intent that opens up the MainActivity
        Intent startActivityIntent = new Intent(context, MainActivity.class);

        // Create a PendingIntent using getActivity that:
        // - Take the context passed in as a parameter
        // - Takes an unique integer ID for the pending intent (we can create a constant for
        //   this integer above
        // - Takes the intent to open the MainActivity we just created; this is what is triggered
        //   when the notification is triggered
        // - Has the flag FLAG_UPDATE_CURRENT, so that if the intent is created again, keep the
        // intent but update the data
        return PendingIntent.getActivity(
                context,
                WATER_REMINDER_PENDING_INTENT_ID,
                startActivityIntent,
                PendingIntent.FLAG_UPDATE_CURRENT);
    }
}
Add Actions
A notification action is an action that the user can take on the notification. The action is made available via an action button on the notification. Like the Intent that determines what happens when the user clicks the notification, a notification action uses a PendingIntent to complete the action. The Android system usually displays a notification action as a button adjacent to the notification content. Starting with Android 4.1 (API level 16), notifications support icons embedded below the content text.
To add a notification action, use the addAction() method with the NotificationCompat.Builder object. Pass in the icon, the title string and the PendingIntent to trigger when the user taps the action.
notificationBuilder.addAction(R.drawable.ic_local_drink_black_24px,
        "I did it!",
        incrementWaterPendingIntent);
Foreground Services
While most services run in the background, some run in the foreground. A foreground service is a service that the user is aware of, so it’s not a candidate for the system to kill when low on memory.
For example, a music player that plays music from a service should be set to run in the foreground, because the user is aware of its operation. The notification in the status bar might indicate the current song and allow the user to launch an activity to interact with the music player.
To request that a service run in the foreground, call startForeground() instead of startService(). This method takes two parameters: an integer that uniquely identifies the notification and the Notification for the status bar. This notification is ongoing, meaning that it can’t be dismissed. It stays in the status bar until the service is stopped or removed from the foreground.
To remove the service from the foreground, call stopForeground(). This method takes a boolean, indicating whether to remove the status bar notification. This method doesn’t stop the service. However, if we stop the service while it’s still running in the foreground, then the notification is also removed.
So now that we understand how services work, let’s review how Android determines our app’s priority when it kills off applications. App priority is divided into four general buckets, critical, high, medium, and low. Within each bucket the apps are prioritized in a queue with the app that’s been at the lowest priority for the longest the first in line to be executed.
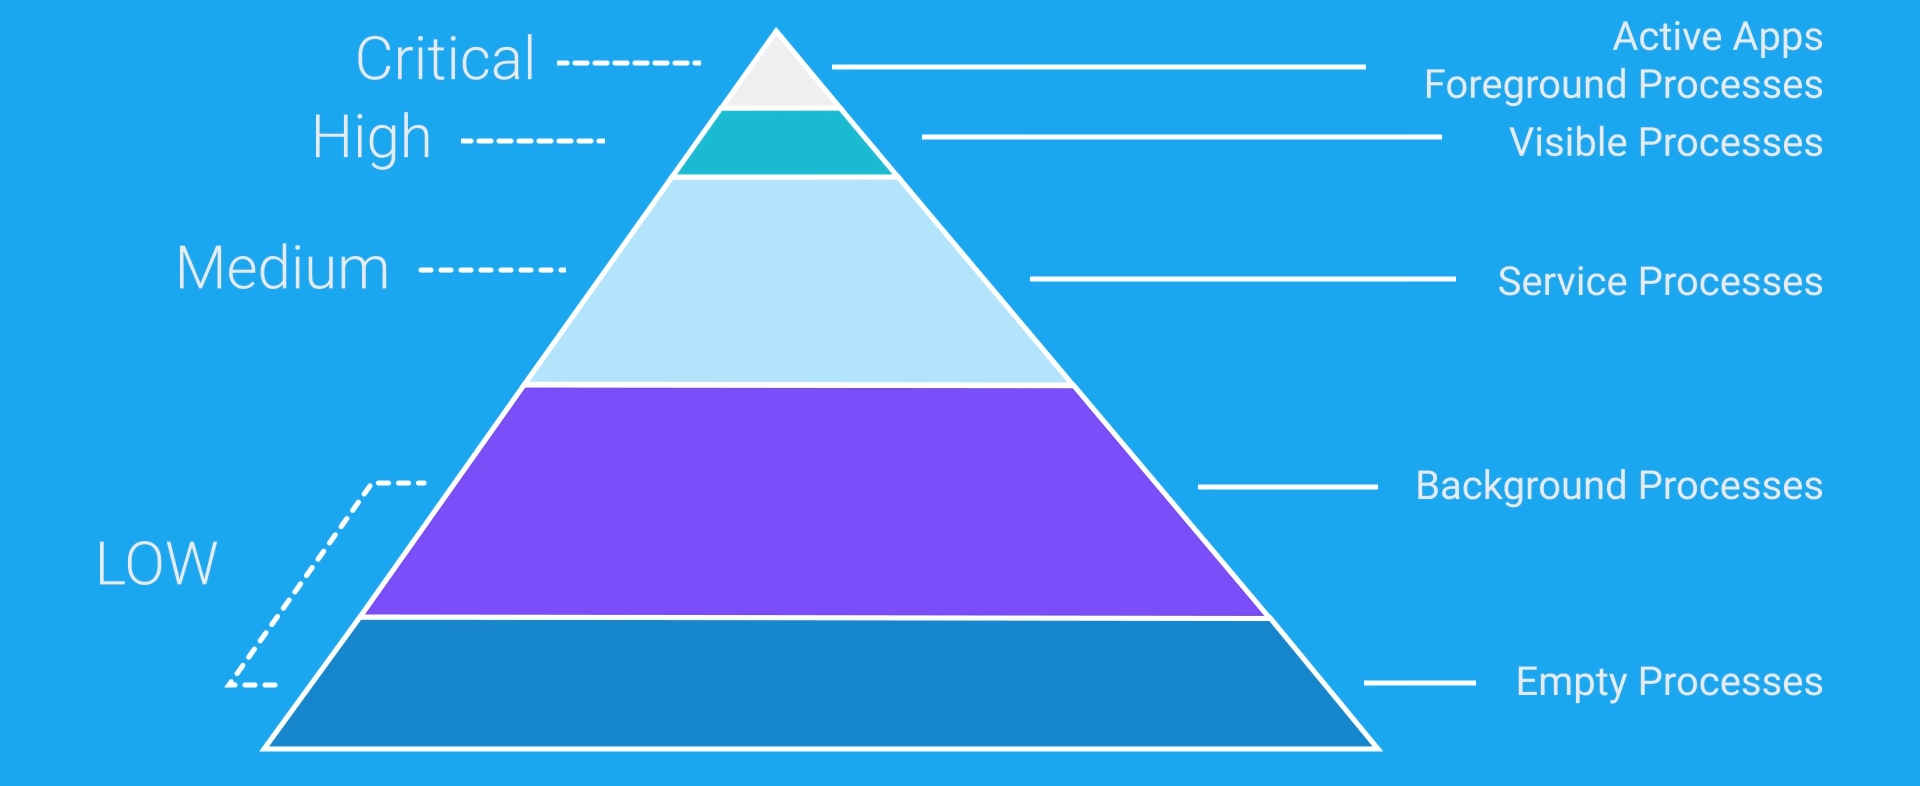
The three laws of Android Resource Management:
- Android will keep all apps that interact with the user running smoothly.
- Android will keep all apps with visible activities followed by services running, unless doing so violates the first law.
- Android will keep all apps in the background running, unless this violates the firts or second law.
Job Scheduler
Modern apps can perform many of their tasks asynchronously, outside the direct flow of user interaction. Scheduling this work intelligently can improve our app’s performance, along with aspects of system health such as battery life. JobScheduler does this scheduling work for us.
There are several APIs that our app can use to schedule background work. Chief among these options is JobScheduler. The JobScheduler API allows us to specify robust conditions for executing tasks, along with centralized task scheduling across the device for optimal system health. JobScheduler also offers highly scalable functionality: it is suitable for small tasks like clearing a cache, and for large ones such as syncing a database to the cloud.
JobScheduler is the Android framework API for scheduling tasks or work. JobScheduler is implemented in the platform, which allows it to collect information about jobs that need to run across all apps. This information is used to schedule jobs to run at, or around, the same time. Batching job execution in this fashion allows the device to enter and stay in sleep states longer, preserving battery life.
We use JobScheduler by registering jobs, specifying their requirements for network and timing. The system then gracefully schedules the jobs to execute at the appropriate times. At the same time, it also defers job execution as necessary to comply with Doze and App Standby restrictions. JobScheduler provides many methods to define job-execution conditions.
Firebase JobDispatcher
Firebase JobDispatcher is an open-source library that provides an API similar to JobScheduler in the Android platform. Firebase JobDispatcher serves as a JobScheduler-compatibility layer for apps targeting versions of Android lower than 5.0 (API level 21).
| Library | Minimum API | Requires Google Play | Service API | Custom retry strategies |
|---|---|---|---|---|
| Framework JobScheduler | 21 | No | JobScheduler | Yes |
| Firebase JobDispatcher | 9 | Yes | JobScheduler | Yes |
To use Firebase JobDispatcher we should follow these steps:
- Add the Gradle dependency. Add the following to our
build.gradle’s dependencies section:
compile 'com.firebase:firebase-jobdispatcher:0.8.5'
- Create a new
Servicethat extends fromJobService.
import com.firebase.jobdispatcher.JobParameters;
import com.firebase.jobdispatcher.JobService;

public class WaterReminderFirebaseJobService extends JobService {
    @Override
    public boolean onStartJob(JobParameters job) {
        // Do some work here
        // By default, jobs are executed on the main thread

        return false; // Answers the question: "Is there still work going on?"
    }

    @Override
    public boolean onStopJob(JobParameters job) {
        return false; // Answers the question: "Should this job be retried?"
    }
}
- Add the
JobServiceto the manifest.
<?xml version="1.0" encoding="utf-8"?>
<manifest xmlns:android="http://schemas.android.com/apk/res/android"
          package="com.example.android.background">

    <application
        ... >
        <activity
            ... >
            ...
        </activity>
        ...

        <!-- Add the WaterReminderFirebaseJobService. It should not be exported and it
         should have an intent filter for the action com.firebase.jobdispatcher.ACTION_EXECUTE -->
        <!-- This is the Service declaration used in conjunction with FirebaseJobDispatcher -->
        <service
            android:name=".sync.WaterReminderFirebaseJobService"
            android:exported="false">
            <intent-filter>
                <action android:name="com.firebase.jobdispatcher.ACTION_EXECUTE"/>
            </intent-filter>
        </service>
    </application>
</manifest>
- Schedule with
FirebaseJobDispatcher.
public class ReminderUtilities {
    /*
     * Interval at which to remind the user to drink water. Use TimeUnit for convenience, rather
     * than writing out a bunch of multiplication ourselves and risk making a silly mistake.
     */
    private static final int REMINDER_INTERVAL_MINUTES = 15;
    private static final int REMINDER_INTERVAL_SECONDS =
            (int) (TimeUnit.MINUTES.toSeconds(REMINDER_INTERVAL_MINUTES));
    private static final int SYNC_FLEXTIME_SECONDS = REMINDER_INTERVAL_SECONDS;

    private static final String REMINDER_JOB_TAG = "hydration_reminder_tag";

    private static boolean sInitialized;

    // Create a synchronized, public static method called scheduleChargingReminder that takes
    // in a context. This method will use FirebaseJobDispatcher to schedule a job that repeats
    // roughly every REMINDER_INTERVAL_SECONDS when the phone is charging. It will trigger
    // WaterReminderFirebaseJobService.
    synchronized public static void scheduleChargingReminder(@NonNull final Context context) {
        // If the job has already been initialized, return
        if (sInitialized) return;

        // Create a new GooglePlayDriver
        Driver driver = new GooglePlayDriver(context);
        // Create a new FirebaseJobDispatcher with the driver
        FirebaseJobDispatcher dispatcher = new FirebaseJobDispatcher(driver);

        /* Create the Job to periodically create reminders to drink water */
        Job constraintReminderJob = dispatcher.newJobBuilder()
                /* The Service that will be used to write to preferences */
                .setService(WaterReminderFirebaseJobService.class)
                /*
                 * Set the UNIQUE tag used to identify this Job.
                 */
                .setTag(REMINDER_JOB_TAG)
                /*
                 * Network constraints on which this Job should run. In this app, we're using the
                 * device charging constraint so that the job only executes if the device is
                 * charging.
                 *
                 * In a normal app, it might be a good idea to include a preference for this,
                 * as different users may have different preferences on when we should be
                 * syncing our application's data.
                 */
                .setConstraints(Constraint.DEVICE_CHARGING)
                /*
                 * setLifetime sets how long this job should persist. The options are to keep the
                 * Job "forever" or to have it die the next time the device boots up.
                 */
                .setLifetime(Lifetime.FOREVER)
                /*
                 * We want these reminders to continuously happen, so we tell this Job to recur.
                 */
                .setRecurring(true)
                /*
                 * We want the reminders to happen every 15 minutes or so. The first argument for
                 * Trigger class's static executionWindow method is the start of the time frame
                 * when the
                 * job should be performed. The second argument is the latest point in time at
                 * which the data should be synced. Please note that this end time is not
                 * guaranteed, but is more of a guideline for FirebaseJobDispatcher to go off of.
                 */
                .setTrigger(Trigger.executionWindow(
                        REMINDER_INTERVAL_SECONDS,
                        REMINDER_INTERVAL_SECONDS + SYNC_FLEXTIME_SECONDS))
                /*
                 * If a Job with the tag with provided already exists, this new job will replace
                 * the old one.
                 */
                .setReplaceCurrent(true)
                /* Once the Job is ready, call the builder's build method to return the Job */
                .build();

        /* Schedule the Job with the dispatcher */
        dispatcher.schedule(constraintReminderJob);

        // Set sInitialized to true to mark that we're done setting up the job
        /* The job has been initialized */
        sInitialized = true;
    }
}
Broadcast Receiver
Android apps can send or receive broadcast messages from the Android system and other Android apps, similar to the publish-subscribe design pattern. These broadcasts are sent when an event of interest occurs. For example, the Android system sends broadcasts when various system events occur, such as when the system boots up or the device starts charging. Apps can also send custom broadcasts, for example, to notify other apps of something that they might be interested in.
Apps can register to receive specific broadcasts. When a broadcast is sent, the system automatically routes broadcasts to apps that have subscribed to receive that particular type of broadcast. Apps can receive broadcasts in two ways: through manifest-declared receivers and context-registered receivers.
Manifest-declared receivers
If we declare a broadcast receiver in our manifest, the system launches our app (if the app is not already running) when the broadcast is sent.
Note: If our app targets API level 26 or higher, we cannot use the manifest to declare a receiver for implicit broadcasts (broadcasts that do not target our app specifically), except for a few implicit broadcasts that are exempted from that restriction. In most cases, we can use scheduled jobs instead.
To register our broadcast receiver statically, add a <receiver> element to our AndroidManifest.xml file. Within the <receiver> element:
- Use the path to our
BroadcastReceiversubclass as theandroid:nameattribute. - To prevent other applications from sending broadcasts to our receiver, set the optional
android:exportedattribute tofalse. - To specify the types of intents the component is listening for, use a nested
<intent-filter>element.
Context-registered receivers
To register a receiver with a context, perform the following steps:
-
Create an instance of
BroadcastReceiver. -
Create an
IntentFilterand register the receiver by callingregisterReceiver(BroadcastReceiver, IntentFilter):
Context-registered receivers receive broadcasts as long as their registering context is valid. For an example, if we register within anActivitycontext, we receive broadcasts as long as the activity is not destroyed. If we register with the Application context, we receive broadcasts as long as the app is running. -
To stop receiving broadcasts, call
unregisterReceiver(android.content.BroadcastReceiver). Be sure to unregister the receiver when we no longer need it or the context is no longer valid.
Be mindful of where we register and unregister the receiver, for example, if we register a receiver inonResume(), we should unregister it inonPause()to prevent registering it multiple times. Do not unregister inonSaveInstanceState(Bundle), because this isn’t called if the user moves back in the history stack.
public class MainActivity extends AppCompatActivity {

    ChargingBroadcastReceiver mChargingReceiver;
    IntentFilter mChargingIntentFilter;

    @Override
    protected void onCreate(Bundle savedInstanceState) {
        super.onCreate(savedInstanceState);
        setContentView(R.layout.activity_main);

        /*
         * Setup and register the broadcast receiver
         */
        mChargingIntentFilter = new IntentFilter();
        mChargingReceiver = new ChargingBroadcastReceiver();
        // Call the addAction method on your intent filter and add Intent.ACTION_POWER_CONNECTED
        // and Intent.ACTION_POWER_DISCONNECTED. This sets up an intent filter which will trigger
        // when the charging state changes.
        mChargingIntentFilter.addAction(Intent.ACTION_POWER_CONNECTED);
        mChargingIntentFilter.addAction(Intent.ACTION_POWER_DISCONNECTED);
    }

    // Override onResume and setup your broadcast receiver. Do this by calling
    // registerReceiver with the ChargingBroadcastReceiver and IntentFilter.
    @Override
    protected void onResume() {
        super.onResume();
        registerReceiver(mChargingReceiver, mChargingIntentFilter);
    }

    // Override onPause and unregister your receiver using the unregisterReceiver method
    @Override
    protected void onPause() {
        super.onPause();
        unregisterReceiver(mChargingReceiver);
    }

    // Create an inner class called ChargingBroadcastReceiver that extends BroadcastReceiver
    private class ChargingBroadcastReceiver extends BroadcastReceiver {
        // Override onReceive to get the action from the intent and see if it matches the
        // Intent.ACTION_POWER_CONNECTED. If it matches, it's charging. If it doesn't match it's not
        // charging.
        @Override
        public void onReceive(Context context, Intent intent) {
            String action = intent.getAction();
            boolean isCharging = (action.equals(Intent.ACTION_POWER_CONNECTED));

            // Update the UI using the showCharging method you wrote
            showCharging(isCharging);
        }
    }
}
References
Services API Guide
Notifications Guidelines
Notifications API Guide
PendingIntent reference
Notification Channels and Badges Codelab
Intelligent Job-Scheduling
Firebase JobDispatcher
Broadcasts API Guide
BroadcastReceiver reference
Local Broadcast, less overhead and secure in Android
How to handle background services in ANDROID O? by Keval Patel
Deep Dive into Android Services by Nazmul Idris