In this lesson we’ll get to make your own Content Provider! We will follow a step by step guide to create our own Content Provider.
Index
- Content Provider
- Steps for building a Content Provider
- Create and Register a Content Provider
- Define Content URIs
- Build the
UriMatcher ContentResolverto Database flow and overview of provider functions- Implementing the
ContentProviderClass
Content Provider
As we have seen in the previous article a content provider manages access to a central repository of data. We implement a provider as one or more classes in an Android application, along with elements in the manifest file. One of our classes implements a subclass ContentProvider, which is the interface between our provider and other applications. Although content providers are meant to make data available to other applications, we may of course have activities in our application that allow the user to query and modify the data managed by our provider.
Steps for building a Content Provider
We need to follow a serie of steps to create a Content Provider:
-
To build a custom content provider, the first step is to create a new provider class that extends from the abstract
ContentProviderclass that’s part of the Android SDK. Extending from Android’sContentProviderclass, ensures that the Content Provider will be recognized as a valid provider. And that it will override all the necessary methods for manipulating data. Adding to this class, we’ll implement it’sonCreatefunction, which is called to initialize the Content Provider. This class is the interface between our data and the rest of the Android system. -
The second step is to register this new provider in the Android Manifest file. Content providers need to be registered similar to activities. So that our app knows that the provider exists and knows how to refer to it by name and authority.
-
We’ll also need to define URIs that identify the Content Provider and the different data types that it can return. These are needed so that later on a
ContentResolvercan find the provider and the specific data we want to access just based on a given URI. -
Once we define these, we’ll then update the Contract Class to include URIs and string constants that will help us refer to the most commonly used URIs.
-
The last step in working with URIs is to build a
URIMatcher. This is a class that helps a content provider recognize and respond correctly to different types of URIs. For example, it’s often useful to use this matcher to distinguish between URIs that point to a large dataset, like multiple rows of data. And URIs that point to a subset of that data, like data for an individual row. -
And finally, in the
ContentProviderclass, we’ll be implementing the required CRUD methods to access and change data. Methods likequery()andinsert().
Create and Register a Content Provider
The ContentProvider instance manages access to a structured set of data by handling requests from other applications. All forms of access eventually call ContentResolver, which then calls a concrete method of ContentProvider to get access.
The abstract class ContentProvider defines six abstract methods that we must implement as part of our own concrete subclass. All of these methods except onCreate() are called by a client application that is attempting to access our content provider.
The first method, onCreate(), is called when the provider is initialized. In general, onCreate() is where we should initialize anything we’ll need to setup and access our underlying data source. In this case, the provider is working with an underlying SQLite database. So here’s a good place to give it a way to open that database with the db helper object.
We will take the example of a ToDo app with a TaskContentProvider for this lesson.
public class TaskContentProvider extends ContentProvider {

    // Member variable for a TaskDbHelper that's initialized in the onCreate() method
    private TaskDbHelper mTaskDbHelper;

    /* onCreate() is where we should initialize anything we'll need to setup
    our underlying data source. */
    @Override
    public boolean onCreate() {
        mTaskDbHelper = new TaskDbHelper(getContext());
        return true;
    }

    // Rest of ContentProvider methods: insert(), query(), delete(), update() and getType()...

}
Then we need to register the ContentProvider in the Android manifest, similar to how we have to declare any activity. Registering the provider in the manifest allows it to be seen by the system so that our app will be able to refer to it later on.
To register a provider, first create a provider tag within the main application tag. In this tag, define the name of the provider, which is the full package name and class. Then also define the authority attribute, and this is just going to be the package name of the app. The last attribute is the exported attribute, which can either be set to true or false. This attribute determines whether or not our ContentProvider can be accessed by other applications.
<?xml version="1.0" encoding="utf-8"?>
<manifest xmlns:android="http://schemas.android.com/apk/res/android"
    ...>

    <application
        ...>

        <!-- The manifest entry for the MainActivity -->
        <activity android:name="com.example.android.todolist.MainActivity">
            ...
        </activity>

        <!-- Register the TaskContentProvider -->
        <!-- Set name, authorities, and exported attributes -->
        <!-- exported = false limits access to this ContentProvider to only this app -->
        <provider
            android:name="com.example.android.todolist.data.TaskContentProvider"
            android:authorities="com.example.android.todolist"
            android:exported="false" />
    </application>
</manifest>
Define Content URIs
A content URI is a URI that identifies data in a provider. Content URIs include the symbolic name of the entire provider (its authority) and a name that points to a table or file (a path). The optional id part points to an individual row in a table. Every data access method of ContentProvider has a content URI as an argument; this allows us to determine the table, row, or file to access.
Designing an authority: a provider usually has a single authority, which serves as its Android-internal name. To avoid conflicts with other providers, we can define our provider authority as an extension of the name of the package containing the provider. For example, if our Android package name is com.example.<appname>,we should give our provider the authority com.example.<appname>.provider.
Designing a path structure: developers usually create content URIs from the authority by appending paths that point to individual tables. For example, if we have two tables table1 and table2, we combine the authority to yield the content URIs com.example.<appname>.provider/table1 and com.example.<appname>.provider/table2. Paths aren’t limited to a single segment, and there doesn’t have to be a table for each level of the path.
Handling content URI IDs: by convention, providers offer access to a single row in a table by accepting a content URI with an ID value for the row at the end of the URI. Also by convention, providers match the ID value to the table’s _ID column, and perform the requested access against the row that matches.
Content URI patterns: to help us choose which action to take for an incoming content URI, the provider API includes the convenience class UriMatcher, which maps content URI “patterns” to integer values. We can use the integer values in a switch statement that chooses the desired action for the content URI or URIs that match a particular pattern.
A content URI pattern matches content URIs using wildcard characters:
*: Matches a string of any valid characters of any length.#: Matches a string of numeric characters of any length.
So when we build our own content provider, it’s up to us to define URIs that both, first identify our provider, and second, identify each different type of data that the provider can work with.
public class TaskContract {

    // The authority, which is how our code knows which Content Provider to access
    public static final String AUTHORITY = "com.example.android.todolist";

    // The base content URI = "content://" + <authority>
    public static final Uri BASE_CONTENT_URI = Uri.parse("content://" + AUTHORITY);

    // Define the possible paths for accessing data in this contract
    // This is the path for the "tasks" directory
    public static final String PATH_TASKS = "tasks";

    /* TaskEntry is an inner class that defines the contents of the task table */
    public static final class TaskEntry implements BaseColumns {
        // TaskEntry content URI = base content URI + path
        public static final Uri CONTENT_URI =
                BASE_CONTENT_URI.buildUpon().appendPath(PATH_TASKS).build();

        // Rest of TaskEntry

    }
}
Build the UriMatcher
The provider has to have a way to recognize the different URIs that are sent to it, and based on the path, match it with specific data. So whether it receives a URI for a large directory, or just a single row of data, it can interact with it correctly in each case. And it’s up to us to code this URI recognition.
It’s the job of a UriMatcher to determine what kind of URI the provider receives. And match it to an integer constant, so that we can easily make a switch statement. Using a switch statement will make our code much more readable. And this will be easier to understand in actual code. So in our ContentProvider code, let’s build a UriMatcher so that it can identify the two types of URIs we defined.
public class TaskContentProvider extends ContentProvider {

    // Define final integer constants for the directory of tasks and a single item.
    // It's convention to use 100, 200, 300, etc for directories,
    // and related ints (101, 102, ..) for items in that directory.
    public static final int TASKS = 100;
    public static final int TASK_WITH_ID = 101;

    // Declare a static variable for the Uri matcher that we construct
    private static final UriMatcher sUriMatcher = buildUriMatcher();

    // Define a static buildUriMatcher method that associates URI's with their int match
    /**
     Initialize a new matcher object without any matches,
     then use .addURI(String authority, String path, int match) to add matches
     */
    public static UriMatcher buildUriMatcher() {

        // Initialize a UriMatcher with no matches by passing in NO_MATCH to the constructor
        UriMatcher uriMatcher = new UriMatcher(UriMatcher.NO_MATCH);

        /*
          All paths added to the UriMatcher have a corresponding int.
          For each kind of uri we may want to access, add the corresponding match with addURI.
          The two calls below add matches for the task directory and a single item by ID.
         */
        uriMatcher.addURI(TaskContract.AUTHORITY, TaskContract.PATH_TASKS, TASKS);
        uriMatcher.addURI(TaskContract.AUTHORITY, TaskContract.PATH_TASKS + "/#", TASK_WITH_ID);

        return uriMatcher;
    }

    // Rest of TaskContentProvider
}
ContentResolver to Database flow and overview of provider functions
Now that we’ve built a URIMatcher, let’s go through the detailed, end-to-end flow for how data moves from the database to the user interface.
Let’s say that our app is querying for data to display in the UI. First, from the UI code the app will get a ContentResolver and call query() on it, passing in the URI for the exact provider and data we want to read. Then the Resolver finds the correct content provider based on the authority of the passed in URI and passes on the query. The Provider’s query function will then use the URIMatcher we’ve built to decide how to react to the passed in URI and determine what kind of data to retrieve. Whether that’s one row of data or the directory of all data or some other specific selection. Based on the match, the query function will basically translate the URI and other parameters into the correct SQL code for selected data.
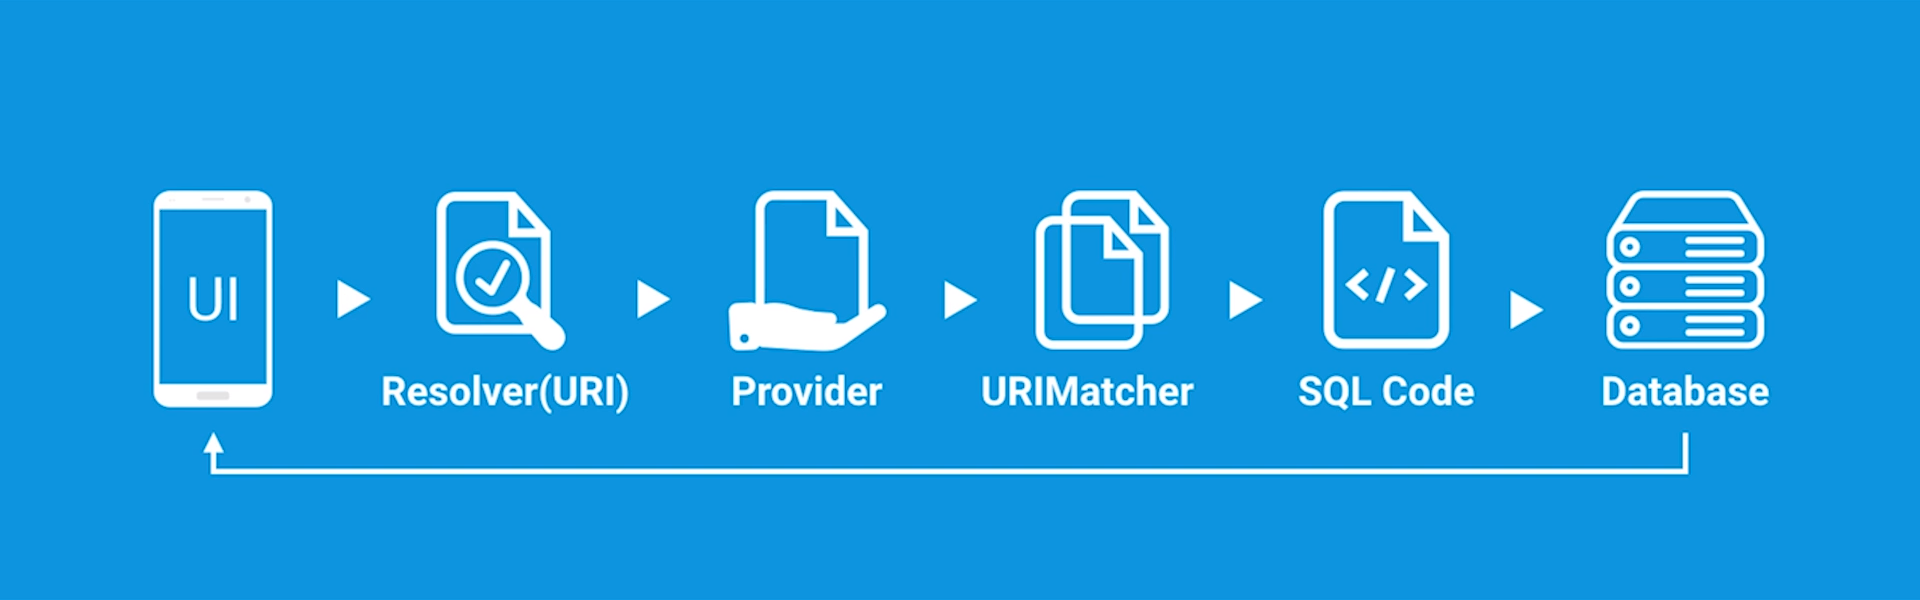
So, using the UriMatcher and the code for our query, the provider will then retrieve the desired data from the underlying database. Then the call travels all the way back to the Resolver in our UI code and returns a cursor with that data, and this is how all calls from our UI to the database will function, passing through the provider to reach the database.
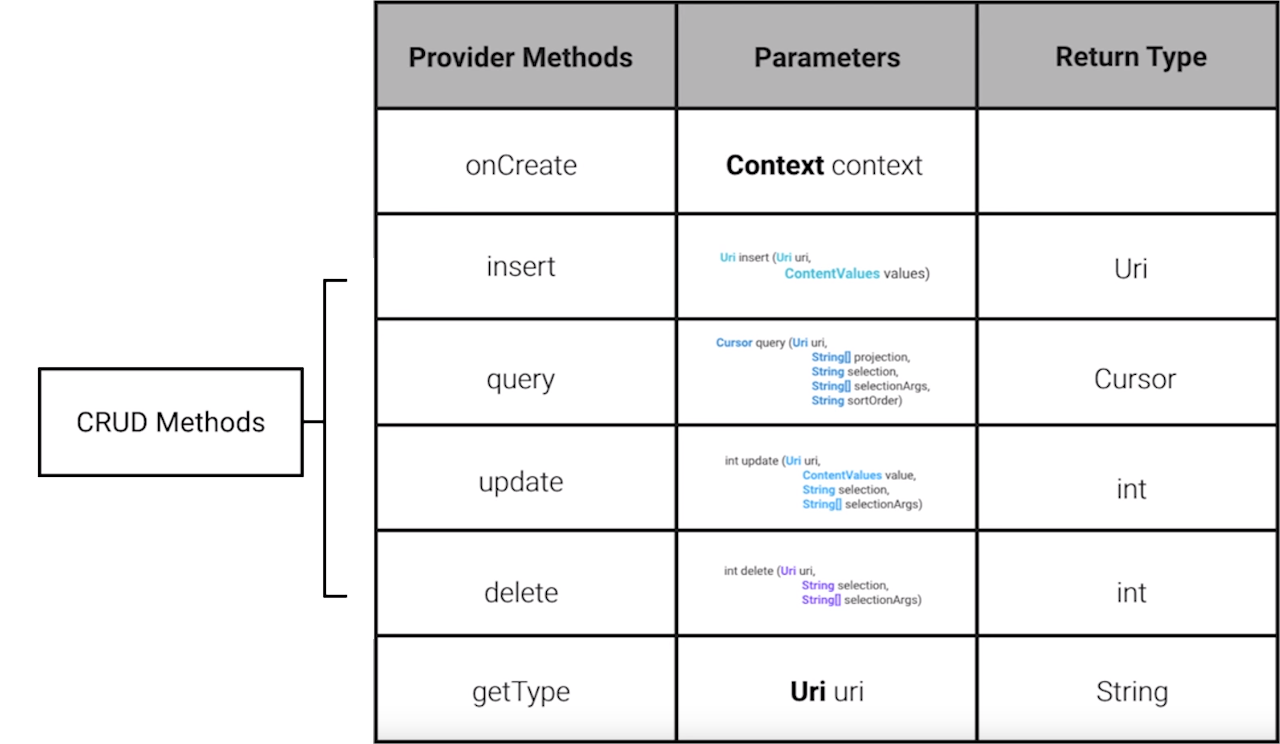
There are six functions that every ContentProvider is required to have. The first is onCreate(), which initializes the provider, and which we’ve already implemented. Then there are the four so-called CRUD methods, where CRUD stands for create, read, update and delete. And these are the four main functions used for persistent data storage.
Implementing the ContentProvider Class
The ContentProvider instance manages access to a structured set of data by handling requests from our own applitation or from other applications. All forms of access eventually call ContentResolver, which then calls a concrete method of ContentProvider to get access.
Required methods
The ContentProvider class defines six abstract methods that we must implement as part of our own concrete subclass. All of these methods except onCreate() are called by a client application that is attempting to access our content provider:
onCreate()
Initialize our provider. The Android system calls this method immediately after it creates our provider. Notice that our provider is not created until aContentResolverobject tries to access it.query()
Retrieve data from our provider. Use the arguments to select the table to query, the rows and columns to return, and the sort order of the result. Return the data as aCursorobject.insert()
Insert a new row into our provider. Use the arguments to select the destination table and to get the column values to use. Return a content URI for the newly-inserted row.update()
Update existing rows in our provider. Use the arguments to select the table and rows to update and to get the updated column values. Return the number of rows updated.delete()
Delete rows from our provider. Use the arguments to select the table and the rows to delete. Return the number of rows deleted.getType()
Return the MIME type corresponding to a content URI.
Implementing the insert() method
The insert() method adds a new row to the appropriate table, using the values in the ContentValues argument. If a column name is not in the ContentValues argument, we may want to provide a default value for it either in our provider code or in our database schema.
This method should return the content URI for the new row. To construct this, append the new row’s _ID value to the table’s content URI, using withAppendedId().
public class TaskContentProvider extends ContentProvider {

    // Initial fields, uriMatcher & onCreate()

    // Implement insert to handle requests to insert a single new row of data
    @Override
    public Uri insert(@NonNull Uri uri, ContentValues values) {
        // Get access to the task database (to write new data to)
        final SQLiteDatabase db = mTaskDbHelper.getWritableDatabase();

        // Write URI matching code to identify the match for the tasks directory
        int match = sUriMatcher.match(uri);
        Uri returnUri; // URI to be returned

        switch (match) {
            case TASKS:
                // Insert new values into the database
                long id = db.insert(TABLE_NAME, null, values);
                if ( id > 0 ) {
                    returnUri = ContentUris.withAppendedId(TaskContract.TaskEntry.CONTENT_URI, id);
                } else {
                    throw new android.database.SQLException("Failed to insert row into " + uri);
                }
                break;
            // Set the value for the returnedUri and write the default case for unknown URI's
            // Default case throws an UnsupportedOperationException
            default:
                throw new UnsupportedOperationException("Unknown uri: " + uri);
        }

        // Notify the resolver if the uri has been changed
        getContext().getContentResolver().notifyChange(uri, null);

        // Return constructed uri (this points to the newly inserted row of data)
        return returnUri;
    }

    // Rest of TaskContentProvider methods
}
Implementing the query() method
The ContentProvider.query() method must return a Cursor object, or if it fails, throw an Exception. If we are using an SQLite database as our data storage, we can simply return the Cursor returned by one of the query() methods of the SQLiteDatabase class. If the query does not match any rows, we should return a Cursor instance whose getCount() method returns 0. We should return null only if an internal error occurred during the query process.
public class TaskContentProvider extends ContentProvider {

    // Initial fields, uriMatcher & onCreate()

    // Implement query to handle requests for data by URI
    @Override
    public Cursor query(@NonNull Uri uri, String[] projection, String selection,
                        String[] selectionArgs, String sortOrder) {

        // Get access to underlying database (read-only for query)
        final SQLiteDatabase db = mTaskDbHelper.getReadableDatabase();

        // Write URI match code and set a variable to return a Cursor
        int match = sUriMatcher.match(uri);
        Cursor retCursor;

        // Query for the tasks directory and write a default case
        switch (match) {
            // Query for the tasks directory
            case TASKS:
                retCursor =  db.query(TABLE_NAME,
                        projection,
                        selection,
                        selectionArgs,
                        null,
                        null,
                        sortOrder);
                break;
            // Add a case to query for a single row of data by ID
            // Use selections and selectionArgs to filter for that ID
            case TASK_WITH_ID:
                // Get the id from the URI
                String id = uri.getPathSegments().get(1);

                // Selection is the _ID column = ?, and the Selection args = the row ID from the URI
                String mSelection = "_id=?";
                String[] mSelectionArgs = new String[]{id};

                // Construct a query as we would normally, passing in the selection/args
                retCursor =  db.query(TABLE_NAME,
                        projection,
                        mSelection,
                        mSelectionArgs,
                        null,
                        null,
                        sortOrder);
                break;
            // Default exception
            default:
                throw new UnsupportedOperationException("Unknown uri: " + uri);
        }

        // Set a notification URI on the Cursor
        retCursor.setNotificationUri(getContext().getContentResolver(), uri);

        // Return the desired Cursor
        return retCursor;
    }

    // Rest of TaskContentProvider methods
}
Implementing the delete() method
The delete() method does not have to physically delete rows from our data storage.
public class TaskContentProvider extends ContentProvider {

    // Initial fields, uriMatcher & onCreate()

    // Implement delete to delete a single row of data
    @Override
    public int delete(@NonNull Uri uri, String selection, String[] selectionArgs) {

        // Get access to the database and write URI matching code to recognize a single item
        final SQLiteDatabase db = mTaskDbHelper.getWritableDatabase();

        int match = sUriMatcher.match(uri);
        // Keep track of the number of deleted tasks
        int tasksDeleted; // starts as 0

        // Write the code to delete a single row of data
        // [Hint] Use selections to delete an item by its row ID
        switch (match) {
            // Handle the single item case, recognized by the ID included in the URI path
            case TASK_WITH_ID:
                // Get the task ID from the URI path
                String id = uri.getPathSegments().get(1);

                // Selection is the _ID column = ?, and the Selection args = the row ID from the URI
                String mSelection = "_id=?";
                String[] mSelectionArgs = new String[]{id};

                // Use selections/selectionArgs to filter for this ID
                tasksDeleted = db.delete(TABLE_NAME, mSelection, mSelectionArgs);
                break;
            default:
                throw new UnsupportedOperationException("Unknown uri: " + uri);
        }

        // Notify the resolver of a change
        if (tasksDeleted != 0) {
            // A task was deleted, set notification
            getContext().getContentResolver().notifyChange(uri, null);
        }

        // Return the number of tasks deleted
        return tasksDeleted;
    }

    // Rest of TaskContentProvider methods
}
Implementing the update() method
The update() method takes the same ContentValues argument used by insert(), and the same selection and selectionArgs arguments used by delete() and ContentProvider.query(). This may allow us to re-use code between these methods.
public class TaskContentProvider extends ContentProvider {

    // Initial fields, uriMatcher & onCreate()

    // This updates a single item (by it's ID) in the tasks directory
    @Override
    public int update(@NonNull Uri uri, ContentValues values, String selection,
                      String[] selectionArgs) {
        //Keep track of if an update occurs
        int tasksUpdated;

        // match code
        int match = sUriMatcher.match(uri);

        switch (match) {
            case TASK_WITH_ID:
                // Get the task ID from the URI path
                String id = uri.getPathSegments().get(1);

                // Selection is the _ID column = ?, and the Selection args = the row ID from the URI
                String mSelection = "_id=?";
                String[] mSelectionArgs = new String[]{id};

                tasksUpdated = mTaskDbHelper.getWritableDatabase().update(TABLE_NAME,
                        values,
                        mSelection,
                        mSelectionArgs);
                break;
            default:
                throw new UnsupportedOperationException("Unknown uri: " + uri);
        }

        if (tasksUpdated != 0) {
            //set notifications if a task was updated
            getContext().getContentResolver().notifyChange(uri, null);
        }

        // return number of tasks updated
        return tasksUpdated;
    }

    // Rest of TaskContentProvider methods
}
Implementing the getType() method
The getType() method returns a String in MIME format that describes the type of data returned by the content URI argument. The Uri argument can be a pattern rather than a specific URI; in this case, we should return the type of data associated with content URIs that match the pattern.
For common types of data such as as text, HTML, or JPEG, getType() should return the standard MIME type for that data.
For content URIs that point to a row or rows of table data, getType() should return a MIME type in Android’s vendor-specific MIME format.
public class TaskContentProvider extends ContentProvider {

    // Initial fields, uriMatcher & onCreate()

    /* getType() handles requests for the MIME type of data
    We are working with two types of data:
    1) a directory and 2) a single row of data.
    This method will not be used in our app, but gives a way to standardize the data formats
    that your provider accesses, and this can be useful for data organization.
    For now, this method will not be used but will be provided for completeness.
    */
    @Override
    public String getType(@NonNull Uri uri) {
        int match = sUriMatcher.match(uri);

        switch (match) {
            case TASKS:
                // directory
                return "vnd.android.cursor.dir" + "/" +
                        TaskContract.AUTHORITY + "/" + TaskContract.PATH_TASKS;
            case TASK_WITH_ID:
                // single item type
                return "vnd.android.cursor.item" + "/" +
                        TaskContract.AUTHORITY + "/" + TaskContract.PATH_TASKS;
            default:
                throw new UnsupportedOperationException("Unknown uri: " + uri);
        }
    }

    // Rest of TaskContentProvider methods
}
References
Creating a Content Provider API guide
ContentProvider reference
UriMatcher reference
Media Types
Steps for creating a Content Provider by Paul Núñez