In this lesson, we’ll learn how to give users a customized experience by creating Preference screens.
Index
- Preferences
- Using
SharedPreferences - Providing Up navigation
- Implementing
PreferenceFragment - Creating resources
Preferences
Android offers an XML-driven framework to create system-style Preference Screens for our applications. By using this framework we can create Preference Activities that are consistent with those used in both native and other third-party applications.
This has two distinct advantages:
- Users will be familiar with the layout and use of our settings screens.
- We can integrate settings screens from other applications (including system settings such as location settings) into our application’s preferences.
The preference framework consists of four parts:
- Preference Screen layout — An XML file that defines the hierarchy of items displayed in our Preference screens. It specifies the text and associated controls to display, the allowed values, and the Shared Preference keys to use for each control.
- Preference Fragment — Extensions of
PreferenceFragmentthat are used to host the Preference Screens. - Preference Header definition — An XML file that defines the Preference Fragments for our application and the hierarchy that should be used to display them.
- Shared Preference Change Listener — An implementation of the
OnSharedPreferenceChangeListenerclass used to listen for changes to Shared Preferences.
Instead of using View objects to build the user interface, settings are built using various subclasses of the Preference class that we declare in an XML file.
Each Preference we add has a corresponding key-value pair that the system uses to save the setting in a default SharedPreferences file for our app’s settings. When the user changes a setting, the system updates the corresponding value in the SharedPreferences file for us. The only time we should directly interact with the associated SharedPreferences file is when we need to read the value in order to determine our app’s behavior based on the user’s setting.
Using SharedPreferences
The SharedPreferences class provides a general framework that allows us to save and retrieve persistent key-value pairs of primitive data types. We can use SharedPreferences to save any primitive data: booleans, floats, ints, longs, and strings. This data will persist across user sessions (even if our application is killed).
We can get a SharedPreferences object for our application, use one of two methods:
getSharedPreferences()- Use this if we need multiple preferences files identified by name, which we specify with the first parameter.getPreferences()- Use this if we need only one preferences file for our Activity. Because this will be the only preferences file for our Activity, we don’t supply a name.
To write values:
- Call
edit()to get aSharedPreferences.Editor. - Add values with methods such as
putBoolean()andputString(). - Commit the new values with
commit()orapply().
To read values, use SharedPreferences methods such as getBoolean() and getString().
public class ParentActivity extends AppCompatActivity {

    @Override
    protected void onCreate(Bundle savedInstanceState) {
        super.onCreate(savedInstanceState);
        setContentView(R.layout.activity_parent);

        // Get a reference to the default shared preferences from
        // the PreferenceManager class
        SharedPreferences sharedPreferences =
                PreferenceManager.getDefaultSharedPreferences(this);

        // STORE SHARED PREFERENCES----------------------------------
        // We need an Editor object to make preference changes.
        // All objects are from android.context.Context
        SharedPreferences.Editor editor = sharedPreferences.edit();
        // Put the true value into "my_pref_key" preference.
        editor.putBoolean("my_pref_key", true);
        // Call apply() or commit() on the Editor object to save the
        // changes asynchronously or synchronously, respectively.
        editor.apply();

        // ACCESS SHARED PREFERENCES---------------------------------
        // Each getter takes a key and a default value (used when no
        // value has yet been saved for that key).
        Boolean myPreference = sharedPreferences.getBoolean("my_pref_key", true)
    }

    // Rest of activity
}
Providing Up navigation
All screens in oour app that are not the main entrance to our app (the “home” screen) should offer the user a way to navigate to the logical parent screen in the app’s hierarchy by pressing the Up button in the action bar. So we need to properly implement this behavior.
For our case, we first need to modify our Manifest and set our settings parent activity launchMode to singleTop, this makes that if an instance of the activity already exists at the top of the target task, the system routes the intent to that instance through a call to its onNewIntent() method, rather than creating a new instance of the activity.
Then we need to declare which activity is the appropriate parent for each activity. Doing so allows the system to facilitate navigation patterns such as Up because the system can determine the logical parent activity from the manifest file.
<?xml version="1.0" encoding="utf-8"?>
    ...

    <application ...>
        <!-- The main/home activity (it has no parent activity) -->
        <activity
            android:name=".ParentActivity"
            android:launchMode="singleTop">
            ...
        </activity>
        <!-- A child of the main activity -->
        <activity
            android:name=".SettingsActivity"
            android:label="@string/action_settings"
            android:parentActivityName=".ParentActivity">
             <!-- Parent activity meta-data to support 4.0 and lower -->
            <meta-data
                android:name="android.support.PARENT_ACTIVITY"
                android:value=".ParentActivity" />
        </activity>
    </application>
</manifest>
After setting up our Manifest file we need to add the Up navigation inside our child activity using the NavUtils APIs.
public class SettingsActivity extends AppCompatActivity {

    @Override
    protected void onCreate(Bundle savedInstanceState) {
        super.onCreate(savedInstanceState);
        setContentView(R.layout.activity_settings);

        ActionBar actionBar = this.getSupportActionBar();

        // Set the action bar back button to look like an up button
        if (actionBar != null) {
            actionBar.setDisplayHomeAsUpEnabled(true);
        }
    }

    @Override
    public boolean onOptionsItemSelected(MenuItem item) {
        // When the home button is pressed, take the user back
        // to the ParentActivity
        if (item.getItemId() == android.R.id.home) {
            NavUtils.navigateUpFromSameTask(this);
        }
        return super.onOptionsItemSelected(item);
    }
}
Implementing PreferenceFragment
In order to use the preferences, we need to import a library. To do so, we add this line to our gradle dependencies.
dependencies {
    ...
    compile 'com.android.support:preference-v7:$support_lib_version'
}
Creating the Preferences
At first, we need to create our preference structure. Using an XML file to define our collection of settings is preferred because the file provides an easy-to-read structure that’s simple to update.
We must save the XML file in the res/xml/ directory. Although we can name the file anything we want, it’s traditionally named preferences.xml. Make sure to add a unique android:key attribute for each preference.
For example:
<?xml version="1.0" encoding="utf-8"?>
<PreferenceScreen xmlns:android="http://schemas.android.com/apk/res/android">

    <CheckBoxPreference
        android:defaultValue="@bool/pref_show_bass_default"
        android:key="@string/pref_show_bass_key"
        android:summaryOff="@string/pref_show_false"
        android:summaryOn="@string/pref_show_true"
        android:title="@string/pref_show_bass_label" />

    <CheckBoxPreference
        android:defaultValue="@bool/pref_show_mid_range_default"
        android:key="@string/pref_show_mid_range_key"
        android:summaryOff="@string/pref_show_false"
        android:summaryOn="@string/pref_show_true"
        android:title="@string/pref_show_mid_range_label" />

    <CheckBoxPreference
        android:defaultValue="@bool/pref_show_treble_default"
        android:key="@string/pref_show_treble_key"
        android:summaryOff="@string/pref_show_false"
        android:summaryOn="@string/pref_show_true"
        android:title="@string/pref_show_treble_label" />

    <EditTextPreference
        android:defaultValue="@string/pref_size_default"
        android:key="@string/pref_size_key"
        android:title="@string/pref_size_label" />

    <ListPreference
        android:defaultValue="@string/pref_color_red_value"
        android:entries="@array/pref_color_option_labels"
        android:entryValues="@array/pref_color_option_values"
        android:key="@string/pref_color_key"
        android:title="@string/pref_color_label" />

</PreferenceScreen>
The v7.preference library provides some preferences we can use: CheckBoxPreference, SwitchPreferenceCompat, EditTextPreference and ListPreference. If we need more than these predefined preferences, we have to build them on our own.
It is a good practice using resources to link to our preferences attributes, we will talk about this below.
Creating the Preference Fragment
Now we need to create our Preference Fragment, where we can show the preferences from our XML file. We do this by creating a new class, called SettingsFragment, which extends PreferenceFragmentCompat. Since the onCreatePreferences is declared as abstract in the source code of the library, we are forced to include our own implementation to tell the fragment to load our just created preferences.xml.
public class PreferenceFragment extends PreferenceFragmentCompat {

    @Override
    public void onCreatePreferences(Bundle savedInstanceState, String rootKey) {
        // Add our preferences, defined in the XML file in res->xml->preferences
        addPreferencesFromResource(R.xml.preferences);
    }
}
Then we need to add this SettingsFragment to our SettingsActivity, the easiest way is to declare it in the activity layout XML file.
<?xml version="1.0" encoding="utf-8"?>
<fragment xmlns:android="http://schemas.android.com/apk/res/android"
    android:id="@+id/activity_settings"
    android:name=".PreferenceFragment"
    android:layout_width="match_parent"
    android:layout_height="match_parent" />
Applying the Preference Theme
Finally we need to specify a preferenceTheme in our Activity’s theme. If we don’t do so, the app will crash with an IllegalStateException.
<resources>

    <!-- Base application theme. -->
    <style name="AppTheme" parent="Theme.AppCompat.Light.DarkActionBar">
        <!-- Customize our theme here. -->
        <item name="colorPrimary">@color/colorPrimary</item>
        <item name="colorPrimaryDark">@color/colorPrimaryDark</item>
        <item name="colorAccent">@color/colorAccent</item>
        <!-- Add a theme for the preference -->
        <item name="preferenceTheme">@style/PreferenceThemeOverlay</item>
    </style>

</resources>
Introducing OnSharedPreferenceChangeListener
The onSharedPreferenceChangeListener can be implemented to invoke a callback whenever a particular Shared Preference value is added, removed, or modified.
This is particularly useful for Activities and Services that use the Shared Preference framework to set application preferences. Using this handler, our application components can listen for changes to user preferences and update their UIs or behavior, as required.
Register our On Shared Preference Change Listeners using the Shared Preference we want to monitor:
// Implement OnSharedPreferenceChangeListener
public class ParentActivity extends AppCompatActivity
        implements SharedPreferences.OnSharedPreferenceChangeListener {

    @Override
    protected void onCreate(Bundle savedInstanceState) {
        super.onCreate(savedInstanceState);
        setContentView(R.layout.activity_parent);

        // Rest of onCreate()

        // Register the listener
        PreferenceManager.getDefaultSharedPreferences(this)
                .registerOnSharedPreferenceChangeListener(this);
    }

    // Override the onSharedPreferenceChanged method and update the preference
    @Override
    public void onSharedPreferenceChanged(SharedPreferences sharedPreferences, String key) {
        // Check the shared preference and key parameters
        if (key.equals("my_pref_key")) {
            // and change UI or behavior as appropriate.
        }
    }

    // Override onDestroy and unregister the listener
    @Override
    protected void onDestroy() {
        super.onDestroy();
        PreferenceManager.getDefaultSharedPreferences(this)
                .unregisterOnSharedPreferenceChangeListener(this);
    }

    // Rest of activity
}
Setting the preference summary programmatically
By default EditTextPreference and ListPreference does not have a hint of the actual value of the preference at first sight when we open the Settings screen, so is a good practice to set the summary of the preference for user to be able to see the value.
The solution passes by using OnSharedPreferenceChangeListener so when the preferences change we can update the UI to show that value. In the CheckBoxPreference we have already write the values to show when they are on and off from the preferences.xml file.
Then to create the summary for the requested preferences we iterate through the preferences of our SettingsFragment and set the summary for those that are not CheckBoxPreference, as in the example:
// Implement OnSharedPreferenceChangeListener
public class SettingsFragment extends PreferenceFragmentCompat
        implements OnSharedPreferenceChangeListener{

    @Override
    public void onCreatePreferences(Bundle bundle, String s) {
        addPreferencesFromResource(R.xml.preferences);

        // Get the preference screen, get the number of preferences and iterate through
        // all of the preferences if it is not a checkbox preference, call the setSummary method
        // passing in a preference and the value of the preference
        SharedPreferences sharedPreferences = getPreferenceScreen().getSharedPreferences();
        PreferenceScreen preferenceScreen = getPreferenceScreen();
        int count = preferenceScreen.getPreferenceCount();

        for (int i = 0; i < count; i++) {
            Preference pref = preferenceScreen.getPreference(i);
            if (!(pref instanceof CheckBoxPreference)) {
                setPreferenceSummary(pref, sharedPreferences.getString(pref.getKey(), ""));
            }
        }
    }

    // Override onSharedPreferenceChanged and, if it is not a checkbox preference,
    // call setPreferenceSummary on the changed preference
    @Override
    public void onSharedPreferenceChanged(SharedPreferences sharedPreferences, String s) {
        Preference pref = findPreference(s);

        if (pref != null) {
            if (!(pref instanceof CheckBoxPreference)) {
                setPreferenceSummary(pref, sharedPreferences.getString(pref.getKey(), ""));
            }
        }
    }

    // Create a setPreferenceSummary which takes a Preference and String value as parameters.
    // This method should check if the preference is a ListPreference or EditTextPreference
    // and, if so, find the label associated with the value. You can do this by using the
    // findIndexOfValue and getEntries methods of Preference.
    private void setPreferenceSummary(Preference preference, String value) {
        if (preference instanceof ListPreference) {
            ListPreference listPreference = (ListPreference) preference;
            int prefIndex = listPreference.findIndexOfValue(value);

            if (prefIndex >= 0) {
                listPreference.setSummary(listPreference.getEntries()[prefIndex]);
            }
        } else if (preference instanceof EditTextPreference) {
            preference.setSummary(value);
        }
    }

    // Register and unregister the OnSharedPreferenceChange listener in
    // onCreate and onDestroy respectively.
    @Override
    public void onCreate(Bundle savedInstanceState) {
        super.onCreate(savedInstanceState);
        getPreferenceScreen().getSharedPreferences()
                .registerOnSharedPreferenceChangeListener(this);
    }

    @Override
    public void onDestroy() {
        super.onDestroy();
        getPreferenceScreen().getSharedPreferences()
                .unregisterOnSharedPreferenceChangeListener(this);
    }
}
Preference values constraints
To limit the acceptable values for some our preferences, we opted to use a PreferenceChangeListener that is not the same as a SharedPreferenceChangeListener. The differences are:
SharedPreferenceChangeListeneris triggered after any value is saved to the SharedPreferences file.PreferenceChangeListeneris triggered before a value is saved to the SharedPreferences file. Because of this, it can prevent an invalid update to a preference.PreferenceChangeListenersare also attached to a single preference.
Generally the flow goes like this:
- User updates a preference.
PreferenceChangeListenertriggered for that preference.- The new value is saved to the SharedPreference file.
onSharedPreferenceChangedlisteners are triggered.
Otherwise they act very similarly. In our activity we implement the Preference.OnPreferenceChangeListener, override the onPreferenceChange(Preference preference, Object newValue). The onPreferenceChange method will return either true or false, depending on whether the preference should actually be saved.
So in our PreferenceFragment:
// Implement OnPreferenceChangeListener
public class SettingsFragment extends PreferenceFragmentCompat implements
         Preference.OnPreferenceChangeListener {

    @Override
    public void onCreatePreferences(Bundle bundle, String s) {
        addPreferencesFromResource(R.xml.preferences);

        // ...

        // Add the OnPreferenceChangeListener specifically to the preference we
        // want to listen for
        Preference preference = findPreference("my_pref_key");
        preference.setOnPreferenceChangeListener(this);
    }

    // Override onPreferenceChange.
    // This method should implement our validation logic and return
    // false if it is not valid. If it is valid, return true.
    @Override
    public boolean onPreferenceChange(Preference preference, Object newValue) {
        // Implement validation logic
        return false
    }

    // Rest of PreferenceFragment
}
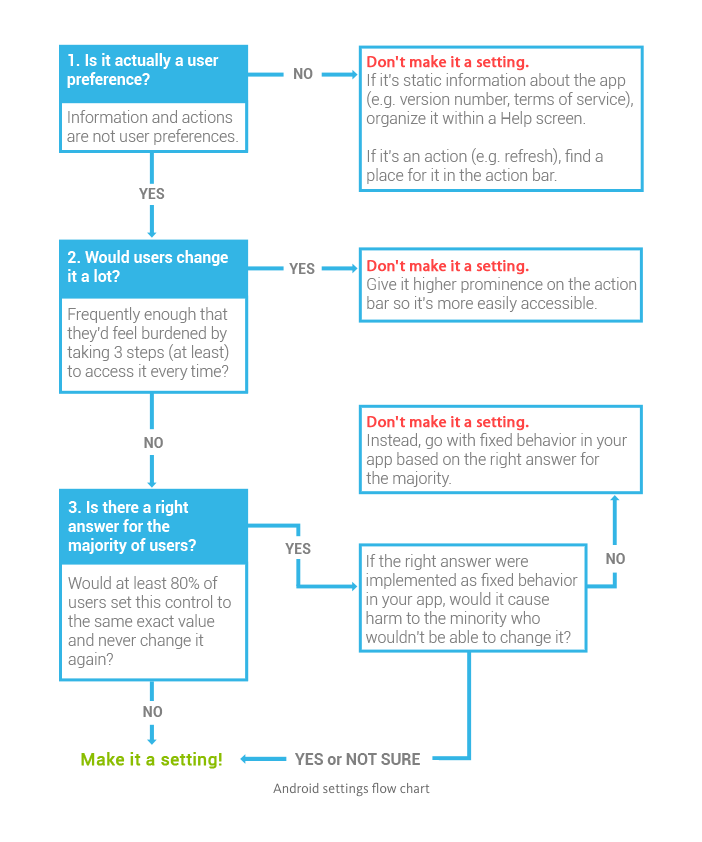
Should it be a Setting?
Giving the users a few key options is good, but overwhelm them with screens, upon screens, upon screens of settings, might by counterproductive. If we can’t decide on a feature, resist the temptation just to make it a setting. That shifts the burden of deciding the value of the setting onto the user. Also remember, it’s always easier to add a setting then it is to remove a setting.
To help us with the decision of whether or not to make something a setting, there is a handy flowchart to look at.
Creating resources
It’s always good practice to keep non-code resources, such as images and string constants, external to our code. Android supports the externalization of resources, ranging from simple values such as strings and colors to more complex resources such as images, animations, themes, and menus.
By externalizing resources, we make them easier to maintain, update, and manage. This also lets us easily define alternative resource values for internationalization and to include different resources to support variations in hardware.
Application resources are stored under the res folder in our project hierarchy. Each of the available resource types is stored in subfolders, grouped by resource type. Each resource type is stored in a different folder: simple values, Drawables, colors, layouts, animations, styles, menus, XML files and raw resources. When our application is built, these resources will be compiled and compressed as efficiently as possible and included in our application package.
We have already seen how to make String resources so we will focus on other simple values. Supported simple values include strings, colors, dimensions, styles, and string or integer arrays. All simple values are stored within XML files in the res/values folder. Within each XML file, we indicate the type of value being stored using tags.
Lets see an example of Boolean and String array resources used in the preferences.xml file example above, we will call them res/values/bools.xml and res/values/arrays.xml.
<!-- res/values/bools.xml -->
<?xml version="1.0" encoding="utf-8"?>
<resources>
    <bool name="pref_show_bass_default">true</bool>
</resources>
<!-- res/values/arrays.xml -->
<?xml version="1.0" encoding="utf-8"?>
<resources>
    <array name="pref_color_option_labels">
        <item>@string/pref_color_red_label</item>
        <item>@string/pref_color_blue_label</item>
        <item>@string/pref_color_green_label</item>
    </array>

    <array name="pref_color_option_values">
        <item>@string/pref_color_red_value</item>
        <item>@string/pref_color_blue_value</item>
        <item>@string/pref_color_green_value</item>
    </array>
</resources>
We can access resources in code using the static R class. R is a generated class based on our external resources, and created when our project is compiled. The R class contains static subclasses for each of the resource types for which we’ve defined at least one resource.
When we need an instance of the resource itself, we need to use helper methods to extract them from the resource table. The resource table is represented within our application as an instance of the Resources class. Use the getResources method on our application context to access our application’s Resources instance:
public class MainActivity extends AppCompatActivity {

    @Override
    protected void onCreate(Bundle savedInstanceState) {
        super.onCreate(savedInstanceState);
        setContentView(R.layout.activity_main);

        Resources myResources = getResources();

        Boolean showBassDefault =  myResources.getBoolean(R.bool.pref_show_bass_default)

        String[] colorOptionLabels;
        colorOptionLabels = myResources.getStringArray(R.array.pref_color_option_labels);
    }

    // Rest of activity
}
We can also use resource references as attribute values in other XML resources. This is particularly useful for layouts and styles, letting us create specialized variations on themes and localized strings and image assets. It’s also a useful way to support different images and spacing for a layout to ensure that it’s optimized for different screen sizes and resolutions. To reference one resource from another, use the @ notation, as shown in the following snippet:
attribute=”@[packagename:]resourcetype/resourceidentifier”
The example from above accesing Boolean, array and String resources:
<?xml version="1.0" encoding="utf-8"?>
<PreferenceScreen xmlns:android="http://schemas.android.com/apk/res/android">

    <CheckBoxPreference
        android:defaultValue="@bool/pref_show_bass_default"
        android:key="@string/pref_show_bass_key"
        android:summaryOff="@string/pref_show_false"
        android:summaryOn="@string/pref_show_true"
        android:title="@string/pref_show_bass_label" />

    <!-- ... -->

    <ListPreference
        android:defaultValue="@string/pref_color_red_value"
        android:entries="@array/pref_color_option_labels"
        android:entryValues="@array/pref_color_option_values"
        android:key="@string/pref_color_key"
        android:title="@string/pref_color_label" />

</PreferenceScreen>
References
Settings API Guide
Settings patterns guidelines
Preference reference
Storage Options - Using Shared Preferences
SharedPreferences reference
SharedPreferences is your answer to simple storage by Joanna Smith
Providing Up Navigation
Providing Ancestral and Temporal Navigation
Navigation with Back and Up
Understand Android Activity’s launchMode: standard, singleTop, singleTask and singleInstance by The Cheese Factory Blog
Building an Android Settings Screen Part 1, Part 2, Part 3 and Part 4 by Jakob Ulbrich