
In this lesson, we’ll learn how to create and run our first simple Android app. In doing so, we’ll explore how to create simple layouts for Android, how Android runs on the phone and the IDE Android Studio.
Index
- Installing Android Studio
- Introduction to git and Github
- Android min and target Versions
- Android Software Stack
- Activities
- Layouts
Installing Android Studio
![]()
The first part when we are beginning in the Android world is preparing our development enviroment.
For us, Android developers, it starts by downloading and installing the JDK (Java Development Kit) from Oracle. Next we need to download and install our favourite Android IDE (Integrated Development Enviroment).
After installing both tools is a good practice to setup your environment variables JAVA_HOME and ANDROID_HOME, so we can build from command line when needed.
Introduction to git and Github
![]()
Git and GitHub are two powerfull tools for us developers, knowing how to use this is a really good point to grow fast, experiment, and keep track of all of our work.
Git is a Version Control System (VCS) that lots of developers use to collaborate with others, ensure every line of code ever written on a project is saved. One of the many git features is that every git directory has a full history of what happened while we can still have many code versions in different places. This allows us to go back in time to whatever state of our project we have commited.
Github is a platform created to host projects which use git as their versioning control system. It has some nice features for code reviewing and contributing. This platform is full of Open Source projects of all kind of technologies. Of course there are lots of good libraries and projects for Android Developers like us.
There are many resources to learn about these tools, there is also a beginner level Udacity course centered in how to Use Git and GitHub.
Android min and target Versions
The minSdkVersion and targetSdkVersion let us express application compatibility with one or more versions of the Android platform, by means of an API Level integer. The API Level expressed by an application will be compared to the API Level of a given Android system, which may vary among different Android devices.
The minSdkVersion is an integer designating the minimum API Level required for the application to run. The Android system will prevent the user from installing the application if the system’s API Level is lower than the value specified in this attribute.
The targetSdkVersion is an integer designating the API Level that the application targets. If not set, the default value equals that given to minSdkVersion.
This attribute informs the system that you have tested against the target version and the system should not enable any compatibility behaviors to maintain your app’s forward-compatibility with the target version. The application is still able to run on older versions (down to minSdkVersion).
To maintain your application along with each Android release, you should increase the value of this attribute to match the latest API level, then thoroughly test your application on the corresponding platform version.
Android Software Stack
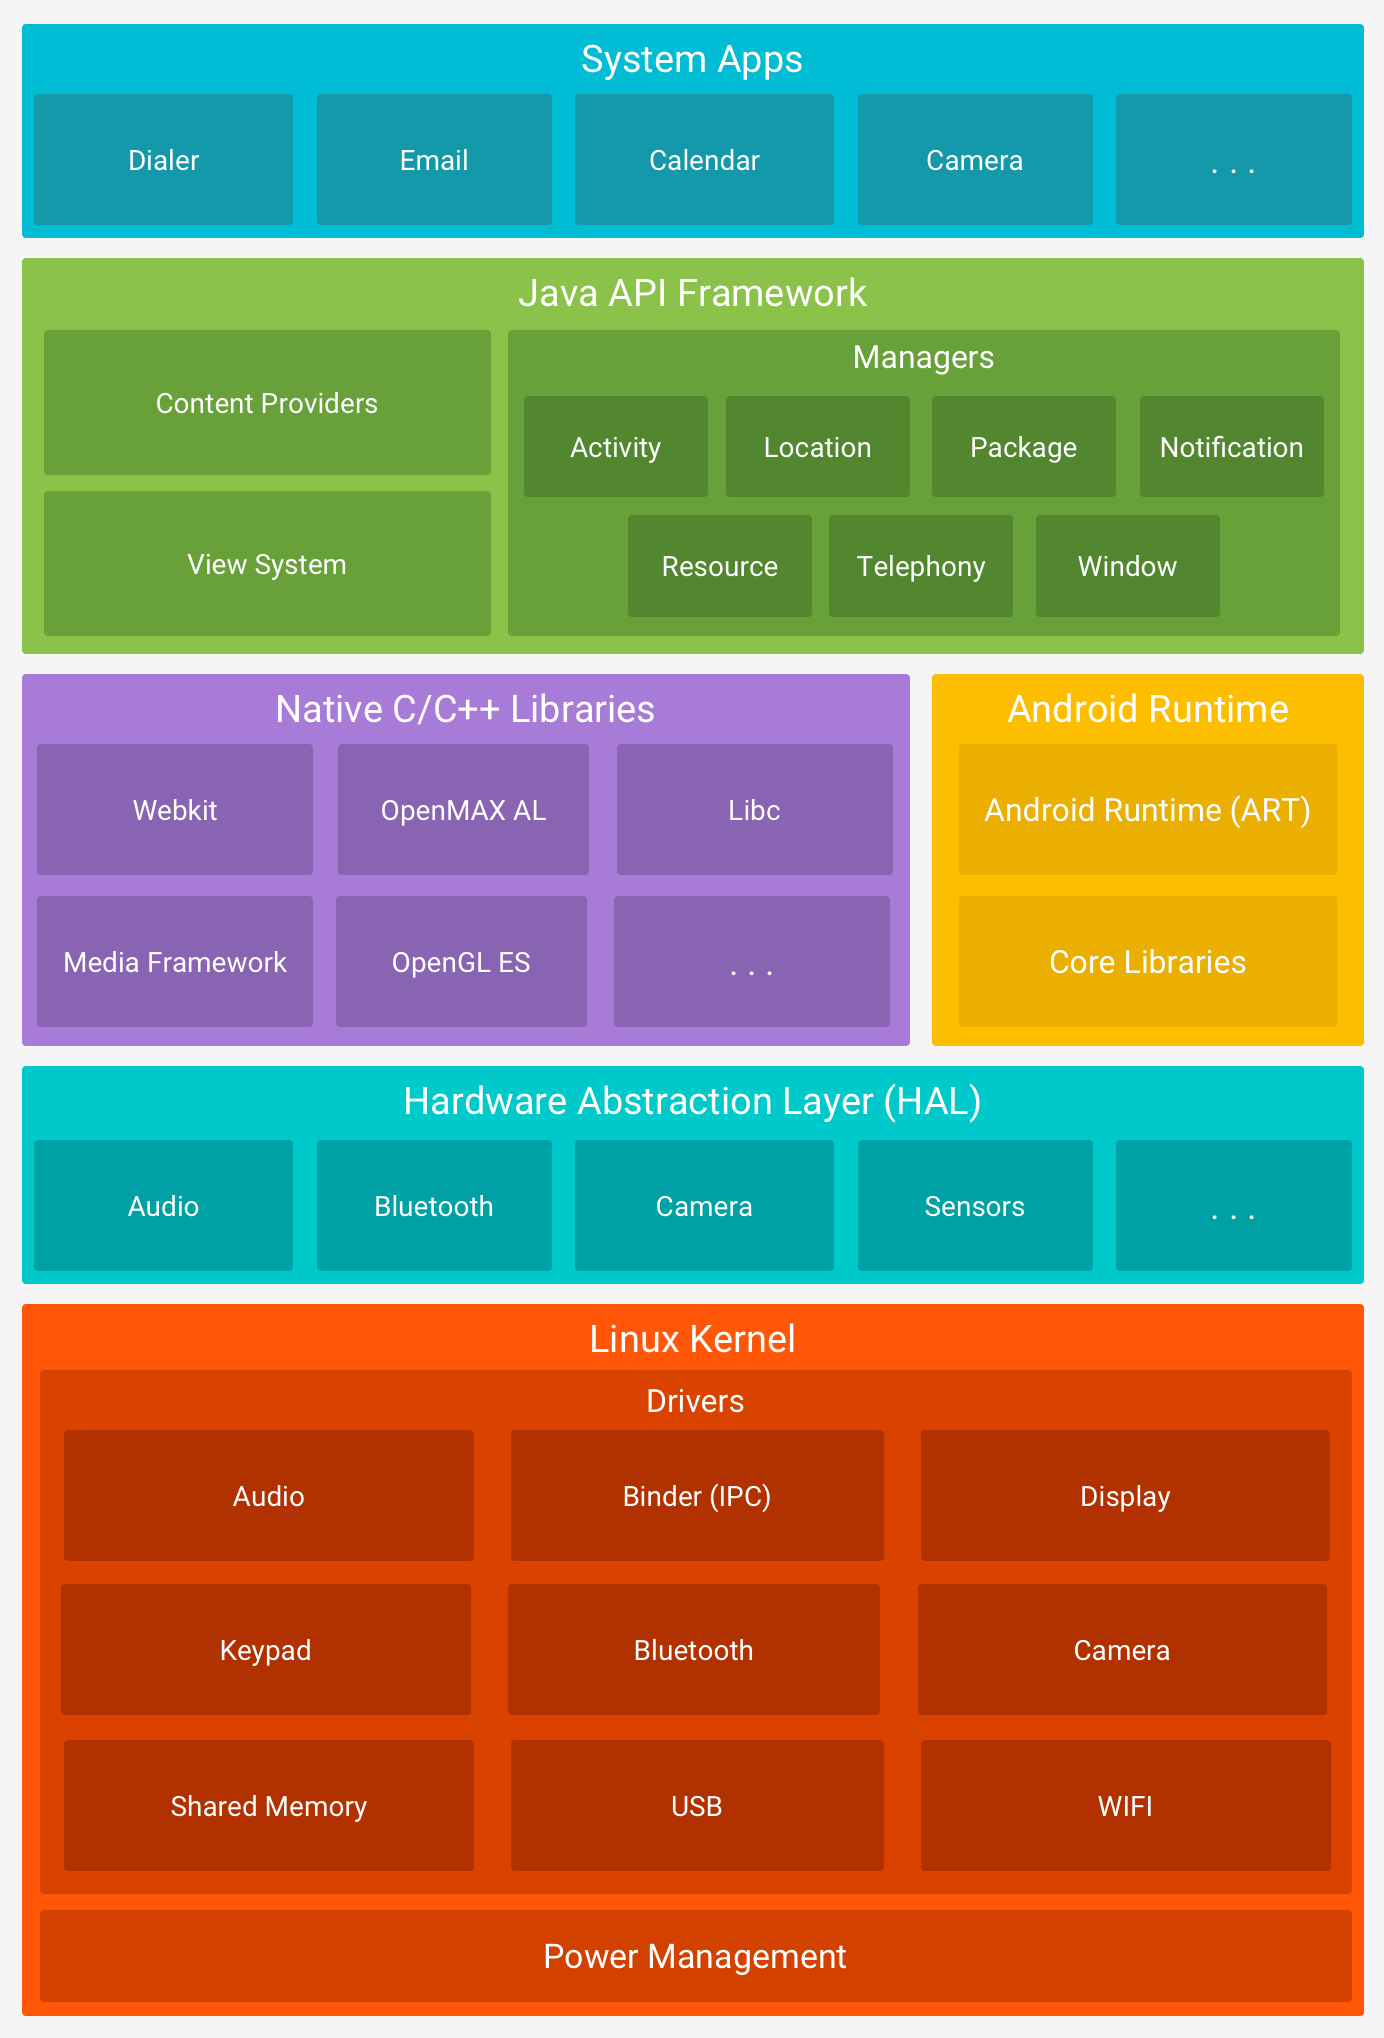
Many of us have always listened that Android is an Operating System (OS), but the reality is that Android is what is called a Software Stack.
What does that mean? According to this StackOverflow thread, the OS is the core kernel of the system and the Software Stack is the software sitting on top of the kernel which enhances and expands the functionality of the system.
So Android is a Software Stack that runs on top of the Linux kernel.
Android is an open source, Linux-based software stack created for a wide array of devices and form factors. The following diagram shows the major components of the Android platform.
— Android Official Documentation
Activities
Activities are one of the fundamental building blocks of apps on the Android platform. They serve as the entry point for a user’s interaction with an app, and are also central to how a user navigates within an app (as with the Back button) or between apps (as with the Recents button).
But before entering to know the activities, we will make an introduction to how apps are made in Android and which are their fundamental components.
-
App
Android apps are a collection of components that work with each other and with Android framework. They can be written using Kotlin, Java, and C++ languages. The Android SDK tools compile our code along with any data and resource files into an APK, an Android package, which is an archive file with an .apk suffix. One APK file contains all the contents of an Android app and is the file that Android-powered devices use to install the app.
Each Android app lives in its own security sandbox, protected by the Android security features.
The Android system implements the principle of least privilege. That is, each app, by default, has access only to the components that it requires to do its work and no more. This creates a secure environment in which an app cannot access parts of the system for which it is not given permission. However, there are ways for an app to share data with other apps and for an app to access system services
-
App components
App components are the essential building blocks of an Android app. Each component is an entry point through which the system or a user can enter our app. Some components depend on others.
There are four different types of app components. Each type serves a distinct purpose and has a distinct lifecycle that defines how the component is created and destroyed. These components are:
- Activities. An activity is the entry point for interacting with the user. It represents a single screen with a user interface.
- Services. A service is a general-purpose entry point for keeping an app running in the background for all kinds of reasons. It is a component that runs in the background to perform long-running operations or to perform work for remote processes. A service does not provide a user interface.
- Broadcast receivers. A broadcast receiver is a component that enables the system to deliver events to the app outside of a regular user flow, allowing the app to respond to system-wide broadcast announcements.
-
Content providers. A content provider manages a shared set of app data that we can store in the file system, in a SQLite database, on the web, or on any other persistent storage location that our app can access. Through the content provider, other apps can query or modify the data if the content provider allows it.
-
Activity
An activity is a single, focused thing that the user can do. Almost all activities interact with the user, so the Activity class takes care of creating a window for us in which we can place your UI with setContentView(View). While activities are often presented to the user as full-screen windows, they can also be used in other ways: as floating windows or embedded inside of another activity (using ActivityGroup). There are two methods almost all subclasses of Activity will implement:
onCreate(Bundle)is where we initialize our activity. Most importantly, here we will usually callsetContentView(int)with a layout resource defining our UI, and usingfindViewById(int)to retrieve the widgets in that UI that we need to interact with programmatically.onPause()is where we deal with the user leaving our activity.
Layouts
As we have seen before an activity is a single focused thing that the user can do. Activities are responsible for creating the window that our application uses to draw and receive events from the system. Activities are written in Java (or Kotlin), extending from the Activity class.
An activity creates views to show the user information, and to let the user interact with the activity. Views are a class in the Android UI framework. They occupy a rectangular area on the screen and are responsible for drawing and handling events. An activity determines what views to create (and where to put them), by reading an XML layout file. These XML files, are stored in the res folder inside the folder labeled layouts.
These XML layout files provides the system with detailed information about what to display and how to display it.
An example of XML layout:

<LinearLayout xmlns:android="http://schemas.android.com/apk/res/android"
    xmlns:tools="http://schemas.android.com/tools"
    android:layout_width="match_parent"
    android:layout_height="match_parent"
    android:orientation="vertical" >

    <ImageView
        android:id="@+id/photo_image_view"
        android:layout_width="match_parent"
        android:layout_height="200dp"
        android:scaleType="centerCrop"
        android:src="@drawable/mountains" />

    <TextView
        android:id="@+id/text_view_description"
        android:layout_width="wrap_content"
        android:layout_height="wrap_content"
        android:padding="16dp"
        android:text="What a beautiful landscape!"
        android:textSize="26sp" />
</LinearLayout>
There are two fundamental types of View components. The UI (User Interface) components that are often interactive, the android.widget package contains a list of most of the UI view classes available to us. The container components, they extend from a class called ViewGroup. They are primarily responsible for containing a group of views and determining where they are on screen. What do we mean by “containing a group of views?”. We mean that a view will be nested inside the tag of another view, like the LinearLayout containing an ImageView and a TextView in the example above.
We also may note that layout views can be nested in one another, so we can nest a LinearLayout inside of a LinearLayout if we so choose.
Views have attributes in XML which control the properties of the view. The properties are things like textSize and padding. Every view has a handful of properties associated with them, which can be found on their documentation pages. These properties can be set to different values. Properties determine the specifics of how a view looks and interacts.
But, how do we have access to these views from Java Activities?
After we create our XML Layout you need to associate it with your activity. This is done in the onCreate method of the Activity using the method setContentView. We pass a reference to the layout file as R.layout.name_of_layout. For example, if our layout from the above example were named activity_main.xml this would look like:
public class MainActivity extends AppCompatActivity {

    private TextView mTextViewDescription;

    @Override
    protected void onCreate(Bundle savedInstanceState) {
       super.onCreate(savedInstanceState);
       setContentView(R.layout.activity_main);

       // Now we set the text of the TextView to another value.
       // First we take a reference of the TextView, with the android:id
       // attribute from the xml layout.
       mTextViewDescription = (TextView) findViewById(R.id.text_view_description);

       // Then we set the new text.
       mTextViewDescription.setText("This new text will be shown");
    }
    // other code
}
So what are those R.layout or R.id things, and what is setContentView actually doing?
The R Class. When our application is compiled the R class is generated. It creates constants that allow us to dynamically identify the various contents of the res folder, including layouts.
setContentView. This method inflates the layout. Essentially what happens is that Android reads our XML file and generates Java objects for each of the tags in your layout file. We can then edit these objects in the Java code by calling methods on the Java objects (like TextView.setText(String text)).
To finish we must keep in mind that designing User Interfaces is not a trivial task. We need to make it look beautiful, accesible, with multiple screen availability, responsive, etc. There is a full extensive guideline of Material Design that help designers and developers go through it.
References
Preparing your Android Environment for development by Rafael Toledo.
Creating a new project and an emulator on Android Studio by Rafael Toledo.
Download Git
Getting Started - Git Basics
git - the simple guide
Atlassian Git Tutorial
GitHub Hello World guide
GitHub for desktop
Picking your compileSdkVersion, minSdkVersion, and targetSdkVersion by Ian Lake.
Android Platform Architecture
Application Fundamentals
Activities
Activity Reference
Android Training - Build a Simple User Interface
Udacity Android Visualizer
Common Android Views Cheat Sheet
Supporting Different Screen Sizes
Building a Responsive UI in Android by Ian Lake
Build a Responsive UI with ConstraintLayout
Udacitity’s Android Basics: User Interface by Google course